

In a normal day’s wear, a watch undergoes surprisingly tough environments. Even a luxury watch, typically hidden under a wearer’s sleeve has to withstand rather harsh conditions. Abrasive sleeves, owners carelessly striking, hitting, scrubbing against common every day surfaces like table tops, doors. These take take their toll.
My personal Datograph, with almost daily wear has scars all over the case to show this. Small hairline scratches here and there show up on the surface, and adds to the patina of the case. For platinum, in particular, this makes a wonderful patina…to me much more character and beauty than a totally new piece.

The bezel of a platinum Lange Datograph, badly scratched with deep gashes.
However, one set of particularly deep gash on the rather hard platinum bezel tells the story of its hard life. There is no denying that I treasure the watch to bits, and take particular pains to shield it from coming into contact with hard objects. In crowds, I have developed the instinct to bend my watch arm behind my back, so as I might avoid brushing against another person’s watch/cuff link, ring or bracelet. I keep the watch safe, protected by my own body.
But in this particular incident which cause this set of deep gashes, I just don’t have any recollection of the watch striking the watch against anything. So painful was the blow, I guess I must have blotted the incident out of my memory.
Fortunately, I had the opportunity to take this back to the Lange manufacture in Glashütte for a complete refresh of the bezel.
Amplified by the microscope, I was horrified! The gashes on the bezel were horrifyingly deep and ugly!
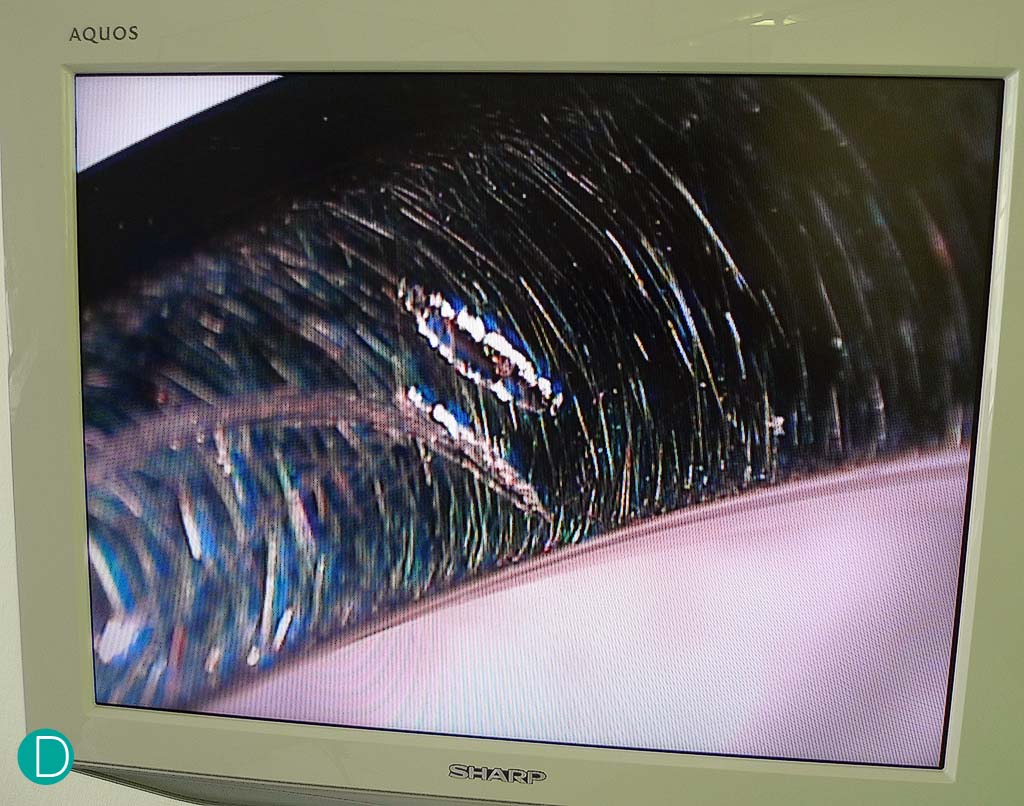
Through the high powered microscope, the gashes looked very deep, and harsh. Note also the hairline scratches around the deep gashes. These are rather common, and under the naked eye, forms the patina which many find beautiful for platinum.
Had this watch from another brand, the only course of action was to replace the bezel with a new one. This would be a simple exercise, but certainly an expensive one. As we understand it, very few manufactures are able to restore a battered case to its original new condition.
And as Lange was one of those who are able, I was able to witness my case being restored. A special department, headed by Thomas Kreher is assigned to restore cases on a daily basis, and to perform their job effectively, they use a variety of tools…some of them very interesting and innovative, and others regular tools found in most horology workshops. And Thomas and team have a trick or two up their sleeves.

Martin Stöhr is a fully qualified watchmaker and was assigned to work on restoring the case.
Meet Martin Stöhr. Martin is a trained watchmaker, qualifying as an apprentice in the Lange School, he was assigned to the case restoration department. He examined my bezel, and though the scars looked horrifying to me, he told me that this type of damage was fairly typical, and he has seen much worse.
Before he started his work, he first handed the watch over to his colleague at the Watch Repair department, who took the bezel out from the case. The Lange case is in 3 parts, the bezel, the case band, and back can be dismantled. And the movement taken out whole. The dismantled bezel was handed back to Martin, who proceeded to perform a special technique called laser welding.

A look through the work window of Martin’s workstation showing how he positions the platinum wire near the bezel before blasting it with the laser. As can be seen left of the wire, the platinum wire has been welded onto the bezel, leaving a keloid like scar. Note colour inherent of the viewing window, which is heavily tinted to protect the eye from the intensity of the laser light.
He held the bezel inside a rather large machine, and via the microscope was able to position a thin platinum wire so that it almost comes into contact with the gash in my bezel.
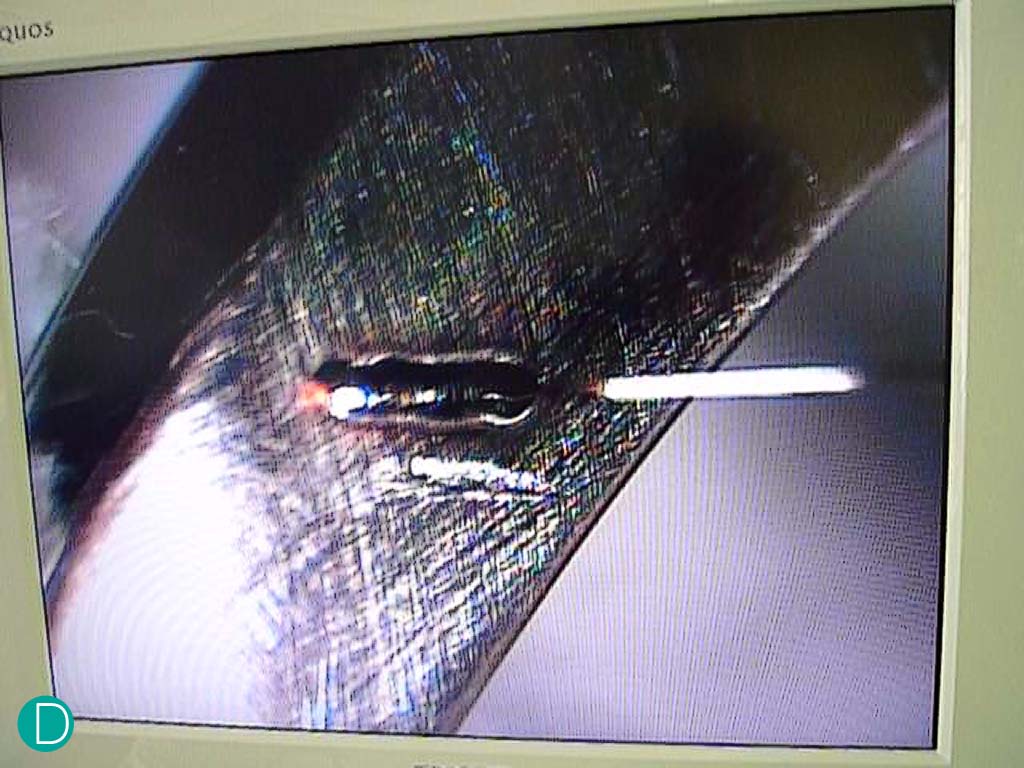
The platinum wire does not even touch the bezel for the laser to deposit it onto the bezel. Photograph taken through the video monitor.
Then with a foot operated switch, he directs a short burst of laser onto the spot where the wire almost comes into contact with the bezel. This laser energy is so intense, that even when pulsed by the computer controlling it, instantly vapourises/melts the platinum of the wire, and deposits this into the gash. Remember that platinum melts at 1773C. He carefully deposits this platinum, which gathers somewhat like a keloid – a scar which forms as the skin heals from a deep gash or wound.
This is shown in the attached video.

After completing the lasering, the bezel bears the marks of a scar like keloid, much like healing flesh.
When he finishes with the bezel, all the deep gashes, are now filled with a small heap of platinum…and now appear just like keloids scars on skin or welds on steel. The excess platinum probably heaps about half a mm above the regular bezel surface.

Grinding down the keloids to the same level as the rest of the bezel.
He then takes this over to his workstation in the next room. And mounts the bezel on a special tool to allow him to hold the bezel securely. He clamps this tool, and proceess to use a small file-like tool to abrase the surface of the welds. Slowly, he reduces the raised welds to approximately the level of the bezel, and then exactly to the same level.
Mid point through the process, the bezel now looks scratched, but without the raised keloids.
At this point, the bezel looks like it has been abrazed with a file…the surface is even, but you can see some rough lines travessing where the gash used to be.

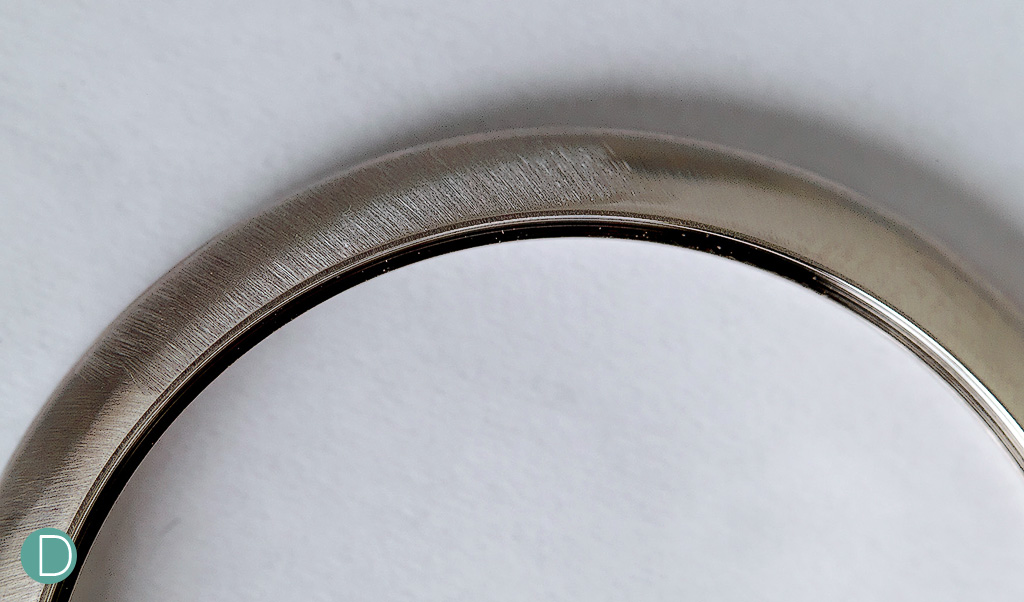
The bezel being polished till it gleams like new.
He next continues with another file, and does the same. He repeats with yet another file, each time with a abrasive surface which is finer and finer. Until finally the abrasion surface is almost smooth, and he is burnishing the surface of the bezel. At which point, the bezel has returned to its former, beautiful self…shining in all its glory. And Martin’s job is done. He returns the bezel to the watchmaker who reassembles the case, reinserts the movement, with new seals, tests for waterproofing, and returns the watch, which now looks like new, to me. Absolutely restored to new condition! Now the process of creating the patina begins again…I hope slowly and small, tiny scratches instead of any large ones.
Thomas and Martin tells me that typically, they can do this to a bezel some 10 times or so before needing to replace the bezel.


1 Comment
Great article. Thanks so much.